Your Guide on How to Stop Roof Leaks for Good
Nothing sends a jolt of panic through a homeowner quite like the sight of a water stain growing on the ceiling. It’s a dreadful moment, but before your mind races to the worst-case scenario, take a breath. A quick, level-headed response is your best tool for keeping the damage to a minimum.
Your first job isn't to scramble onto the roof—it's to manage the water inside your house.
Grab whatever you can—buckets, towels, even a big trash can—to catch the drips. If you see the ceiling starting to bulge, it’s filling with water like a balloon. You can prevent a much bigger mess and a potential ceiling collapse by carefully piercing the center of the bubble with a screwdriver. This lets the water drain in a controlled stream instead of all at once.
With the immediate drip contained, move any furniture, electronics, or family heirlooms out of the splash zone.
Figuring Out What You're Dealing With
Once you've got the indoor situation under control, you can start to play detective. Roof leaks are one of the most common headaches homeowners face. In fact, they account for around 40% of all roofing complaints filed with the Better Business Bureau. The average cost for a professional fix is about $750, but that number can climb fast if a small leak is left to do its work.
The source of the leak really dictates your next move. A single shingle blown off in a storm might be a straightforward DIY fix for a confident homeowner. On the other hand, compromised flashing around a chimney is almost always a job for a pro.
Knowing the likely culprit helps you decide whether to reach for your toolbox or your phone. Many folks in the Upstate find that getting a professional opinion from the start provides peace of mind and stops a small problem from turning into a four-figure disaster. You can learn more about the different exterior repair services that tackle these exact issues.
Key Takeaway: Your immediate goal is damage control, not diagnosis. Secure the area inside your home first by containing the water and protecting your belongings before you attempt to find the source of the leak.
To help you get a quick read on the situation, here’s a look at the usual suspects when it comes to roof leaks and what you might be up against.
Common Roof Leak Sources and Initial Assessment
This table can help you narrow down the possibilities based on what you're seeing. It gives you a sense of where the water might be coming from and whether it's something you might handle yourself or need to call in for backup.
| Cracked Shingles | Visible cracks, curling edges, or missing granules. | Low to Medium |
| Damaged Flashing | Rusted or cracked metal around chimneys, vents, or valleys. | Medium to High |
| Worn Vent Boots | Cracked rubber or plastic seals around roof pipes. | Low to Medium |
| Clogged Gutters | Water overflowing from gutters and backing up under eaves. | Low |
| Compromised Skylights | Water stains or drips around the skylight frame. | High |
Remember, this is just a starting point. Water can travel a long way from where it enters the roof to where it shows up on your ceiling, so a thorough inspection is always the next step.
How to Pinpoint the Exact Source of a Leak
That persistent drip-drip-drip you hear in your living room? The real culprit is probably hiding somewhere completely different. Water is a sneaky traveler; it can run along roof trusses, get behind walls, and slip under shingles before it finally makes its grand entrance. Honestly, finding the entry point is often the toughest part of stopping a roof leak for good.
The first rule of leak detection is to work backward from the damage you can see. Always start your investigation inside, and try to do it during the day when you've got the best natural light.
Start Your Search in the Attic
Your attic is ground zero for finding the evidence. Grab a powerful flashlight and head up, but be extremely careful where you step—only put your weight on the joists or solid framing, never on the drywall ceiling below.
Once you’re safely in position, turn off your flashlight. Look for any slivers of daylight poking through the roof deck. Even a tiny pinhole of light is a direct path for water. If you don't spot any, flick your flashlight back on and scan the underside of the roof sheathing, focusing on the area directly above the ceiling stain.
Keep an eye out for these telltale signs:
- Water Stains: Dark spots, streaks, or rings on the wood are the most obvious clues.
- Mold or Mildew: Any black or discolored patches on the wood or insulation signal a long-term moisture problem.
- Wet Insulation: Saturated insulation looks compressed and will be much darker than the dry, fluffy stuff around it.
- "Shiners": These are roofing nails that completely missed the wooden joists during installation. On a cold, damp day, moisture can condense on the cold metal and drip down, perfectly mimicking a leak.
A classic mistake is assuming the leak is directly above the ceiling stain. Water often gets in, runs down the slope of a rafter, and then drips off at the lowest point—which could be several feet away from where it first entered.
Taking the Investigation Outside
After you've gathered your clues from the attic, it's time to safely inspect the roof's exterior. Never get on a roof that's wet, icy, or excessively steep without the proper safety gear. If you have any doubt, call a pro.
Your goal up there is to find anything that looks out of place. Most roof leaks don't happen in the wide-open field of shingles; they almost always start where something interrupts that field. These penetration points are the most vulnerable spots on any roof.
This is the standard response flow we follow: contain the damage inside first, then move to assessing the exterior to find the source.
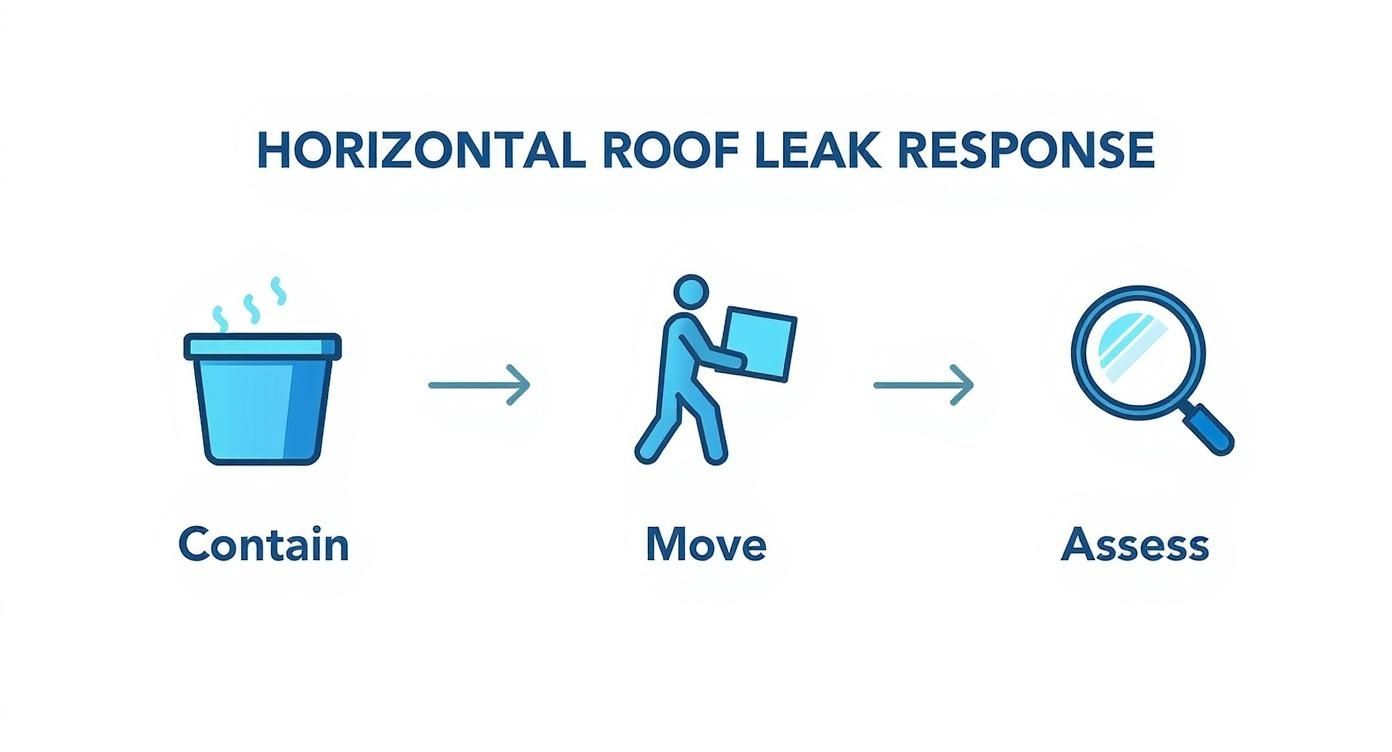
As the graphic shows, once the interior is secure, a thorough assessment is the critical next step to finding the leak’s origin and planning a real fix.
Inspecting Common Exterior Failure Points
Focus your search on the usual suspects—the areas where different materials meet or where objects penetrate the roof.
Roof Vents and Pipe Boots Plumbing vents, exhaust fans, and attic vents all have a seal, or "boot," where they come through the roof. These rubber or plastic seals get baked by the sun and eventually crack and decay. It’s amazing how a tiny crack in a $15 pipe boot can let gallons of water into your home during a storm, causing thousands in damage.
Flashing Around Chimneys and Walls Flashing is the metalwork installed where your roof meets a vertical surface like a chimney, a dormer wall, or a skylight. Its whole job is to direct water away from that joint. Look for sections that are rusted, have pulled loose, or show gaps in the sealant. It’s not just roofs; even flashing on your home's exterior can fail, which is why it's smart to also check the condition of things like your replacement windows for any signs of water intrusion.
Shingle Condition Do a slow scan of the entire roof. Are there any shingles that are cracked, curled up at the edges, or just plain missing? Pay extra close attention to the valleys—those V-shaped channels where two roof planes meet. They handle a massive volume of water and are always high-stress points.
If you’ve checked all these spots and are still stumped, it might be time for a water test. You’ll need a garden hose and a helper inside the attic with a phone. Start low on the roof and gently soak one specific area at a time. Work your way up the roof plane slowly until your spotter inside yells that they see a drip. This methodical approach is the best way to isolate a stubborn leak so you can make a permanent repair.
Emergency Fixes to Stop Water Damage Now
When rain is pouring down and you’ve got a leak, waiting for the storm to pass isn’t an option. The mission right now is damage control—getting a temporary barrier in place to stop water from ruining your ceiling, insulation, and home structure. These are not permanent solutions, but they are absolutely critical for protecting your house until a real repair can happen.
The need for a quick fix is becoming more common than you might think. With the global roofing market valued at $296.21 billion in 2024 and expected to grow, it's clear that demand is rising, partly driven by extreme weather events causing unexpected damage. Knowing how to throw up an emergency patch is a genuine home-saving skill. You can see more on the evolving demands on roofing materials over at This Old House.
The Quick Patch with Roofing Tar
If you're dealing with a smaller, isolated leak from something like a cracked shingle or a popped nail, roofing tar (often called roofing cement) is your best friend. It’s a thick, goopy substance made to seal out water immediately, even when the surface is wet.
You'll need a putty knife or a small trowel. Once you've located the problem spot, clear away any leaves or loose debris. Then, just slather a thick layer of the tar right over the crack or hole. Make sure you spread it at least an inch beyond the damaged area on all sides to create a solid seal.
Pro Tip: This is not the time to be neat or stingy. A thin coat won't hold up against a downpour. You want a substantial, ugly glob that completely covers the problem area, acting like a waterproof bandage that will hold until the weather clears.
It’s a messy job, but it works because the tar literally pushes water out of the way and sticks directly to the roofing material. For stopping a small leak in its tracks, it's incredibly effective.
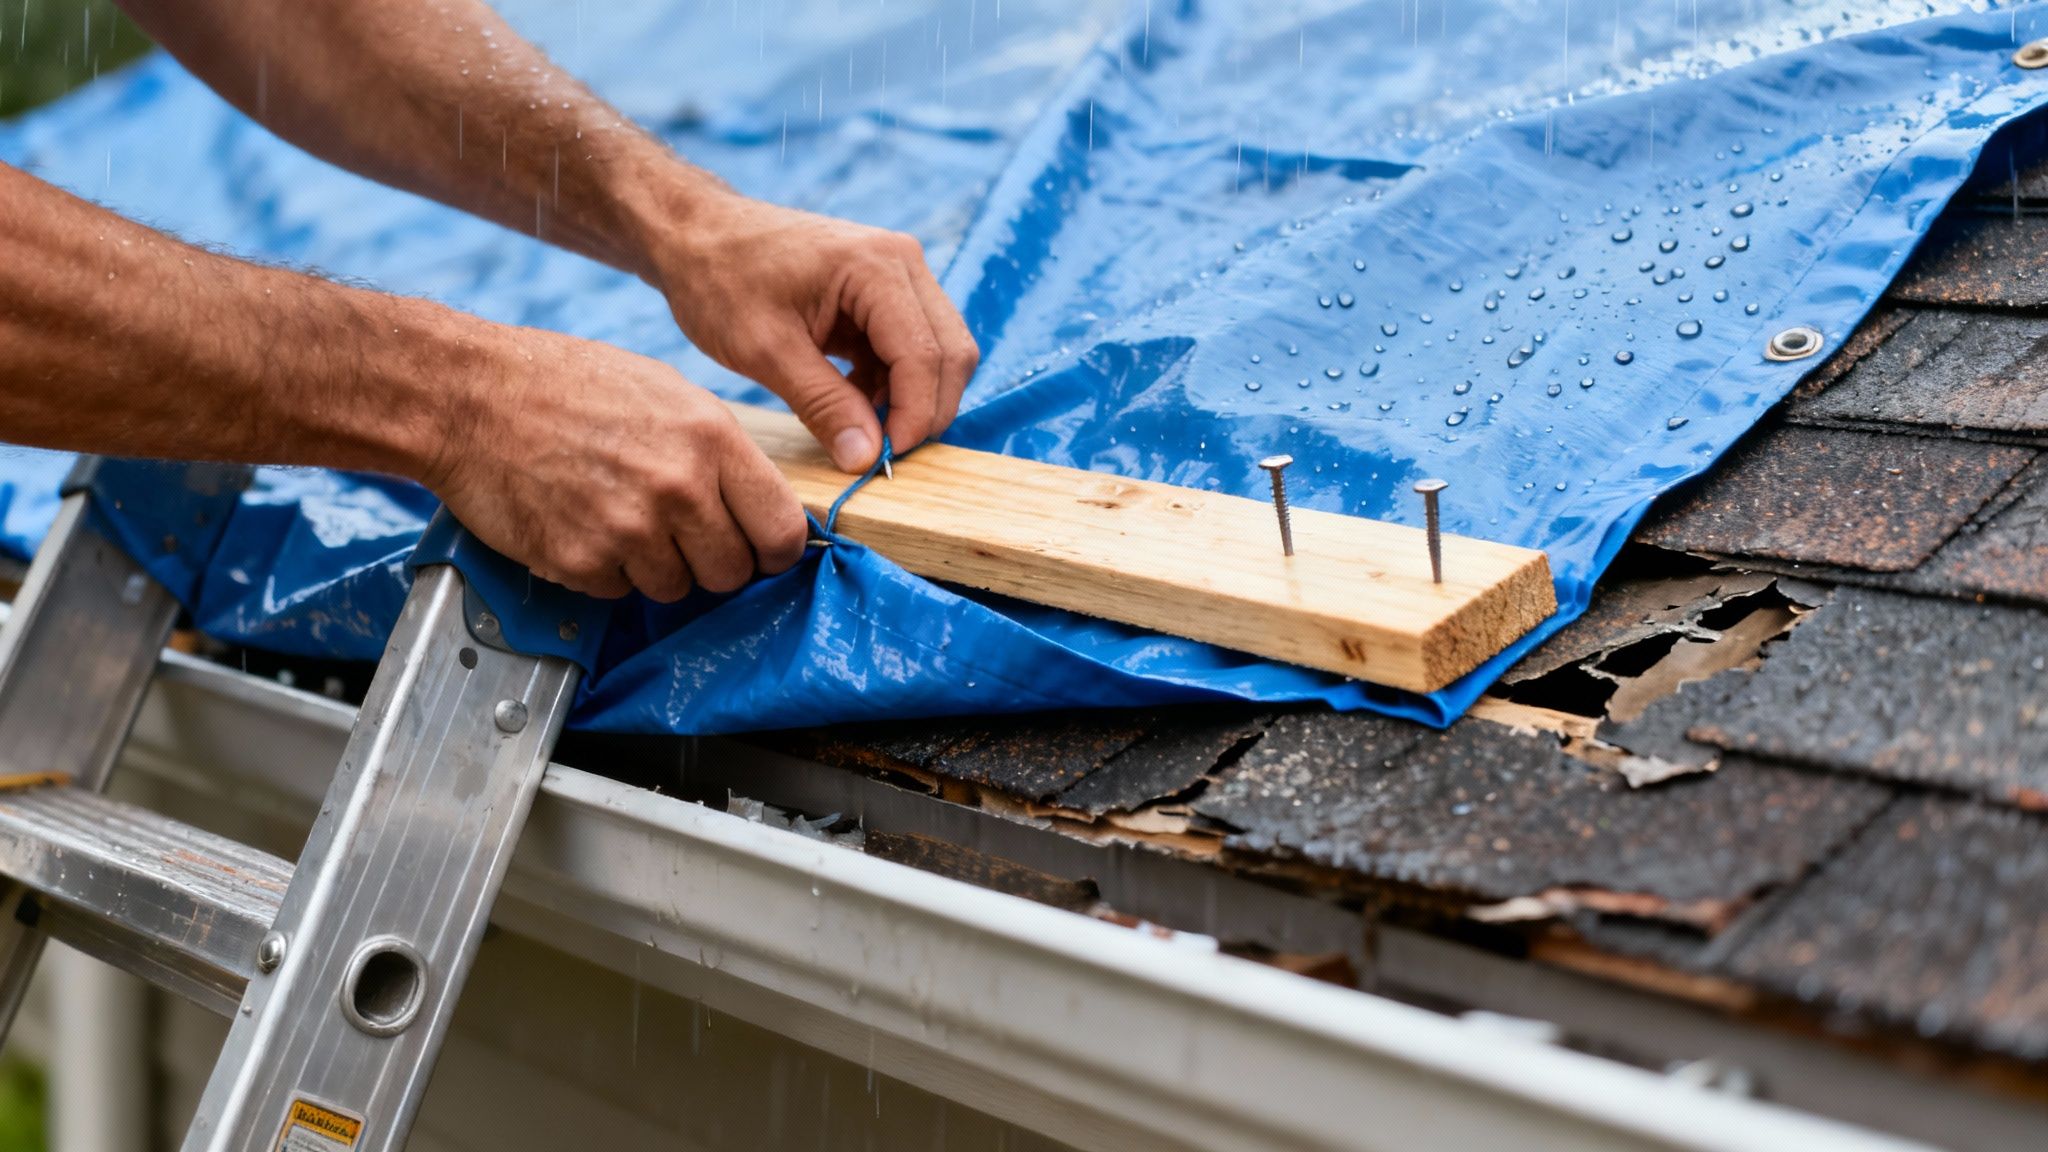
How to Properly Tarp a Damaged Roof Section
When you've lost a few shingles to a wind gust or have a larger area of damage, a tarp is the way to go. But just tossing a tarp up there is a waste of time—the wind will have it in your neighbor's yard in minutes. Securing it correctly is everything.
Here’s how we do it to make sure it holds:
- Measure and Cut: Grab a heavy-duty tarp that extends at least four feet beyond the damaged spot on all sides. You need plenty of overlap to keep wind-driven rain from sneaking underneath.
- Anchor the High Side: Take the top edge of the tarp and run it a few feet above the leak, tucking it under a row of good shingles. Even better, run it all the way over the peak of the roof. This lets water flow naturally down and over the tarp, not under it.
- Lock It Down with Wood: Use 2x4s or other long wood planks to anchor the tarp's edges. Lay a plank right on top of the tarp's edge and drive screws through both the wood and the tarp, securing them to the roof deck. This method spreads out the pressure and keeps the screws from ripping right through the tarp.
A well-secured tarp can handle serious wind and rain, keeping your home dry for days if it has to. Just remember, a temporary fix like this can sometimes affect other parts of your home's exterior. Once the storm passes, it’s a good idea to check everything, and that includes learning more about the condition of your home's siding.
These are effective fixes, but they mean getting up on a wet, slippery roof. Safety comes first. If your roof is steep, if you feel the least bit unsafe, or if the weather is just too severe, don't risk it. Stay inside, manage the water with buckets, and call a professional for an emergency tarping service instead. It's not worth a trip to the hospital.
Permanent DIY Roof Leak Repair Techniques
Once the storm has passed and your roof is completely dry, it's time to shift from that emergency patch to a permanent fix. Tackling a DIY roof repair can feel a little intimidating, I get it. But the good news is that many common leaks are caused by simple failures that a prepared homeowner can absolutely handle.
The key is using the right technique for the specific problem you've found. Do it right, and your repair will last for years, not just until the next downpour.
Let's walk through the most common permanent repairs, from swapping out a single damaged shingle to resealing that vulnerable flashing. With the right tools and a methodical approach, you can stop that leak for good.
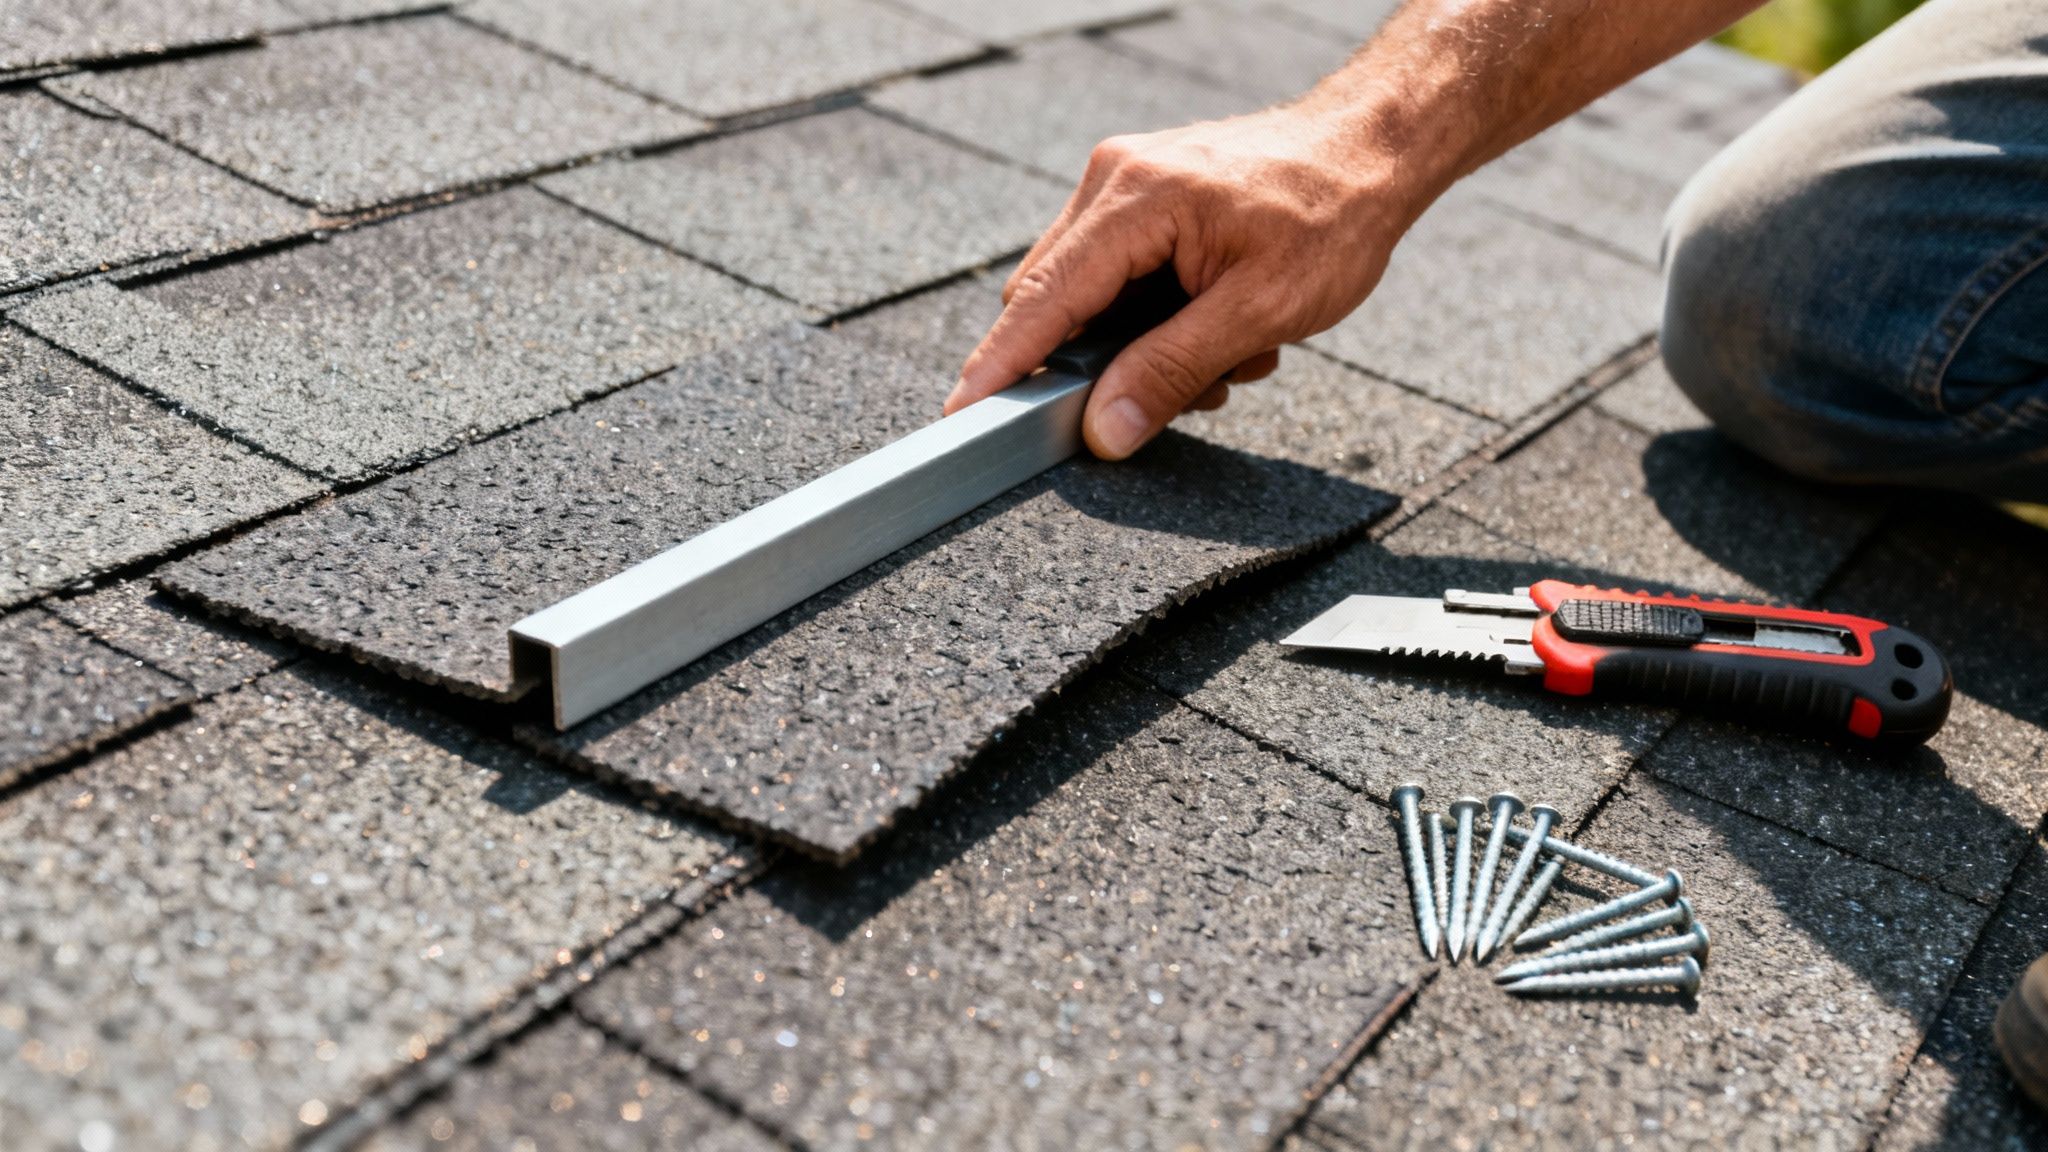
Replacing a Damaged Asphalt Shingle
A single cracked, curled, or missing shingle is probably the most frequent culprit behind a mysterious leak. The fix is pretty straightforward, but it does require a bit of finesse to avoid damaging the surrounding shingles in the process.
First, you’ve got to break the tar seal holding the damaged shingle to the one above it. If you're working on a warm day, the sun may have already softened the sealant, which makes your job a lot easier. Carefully slide a flat pry bar under the edge of the shingle directly above the bad one and gently work it back and forth to break that bond.
With the seal broken, you'll see the nails holding the damaged shingle down. Use the pry bar to lift the shingle just enough to slide the bar's claw end under the nail heads and carefully pry them out. Once those nails are gone, the old shingle should slide right out.
Now, slide your new shingle into position, making sure it aligns perfectly with its neighbors. Secure it with four 1 ¼-inch galvanized roofing nails. Place one nail about an inch in from each side and the other two evenly spaced between them. It’s critical to drive the nails just below the tar line of the shingle above it—that way, the overlapping layer hides the nail heads completely.
To finish, grab your caulk gun and apply a dab of roofing sealant under the corners of the new shingle and the one you lifted. Press them firmly together to recreate that essential waterproof seal.
Resealing and Repairing Flashing
Flashing—those metal strips protecting joints around chimneys, vents, and walls—is a notorious failure point. Over time, the sealant cracks, or the metal itself can rust or pull away from the roof. A thorough resealing job can often solve the problem without needing to replace the metal itself.
Start by using a wire brush to aggressively clean off the old, cracked sealant and any rust or debris from the flashing and the surrounding area. You need a perfectly clean, dry surface for the new sealant to get a proper grip. If you find any loose flashing, use roofing nails to secure it tightly back against the roof deck.
Apply a generous bead of high-quality roofing sealant or cement along all the top edges where the flashing meets the chimney, siding, or vent.
Key Takeaway: When resealing flashing, always apply the new sealant to the top edge of the metal. This creates an overlap where water running down the vertical surface flows over the flashing, not behind it. Applying sealant to the bottom edge can actually trap water and make the leak worse.
Use a putty knife to smooth the bead of sealant, pressing it firmly into the joint to eliminate any air bubbles or gaps. This simple bit of maintenance can add years to the life of your flashing.
Fixing Leaks from Popped Nails and Vent Boots
Sometimes, the simplest issues cause the biggest headaches. A roofing nail that has worked its way up can create a direct channel for water into your home. Likewise, the rubber boot around a plumbing vent pipe will eventually crack after years of sun exposure.
- For a Popped Nail: Don't just hammer it back down. Use a flat bar to lift the shingle just enough to pull the nail out completely. Squeeze a small amount of roofing sealant into the old nail hole, then drive the nail back into a fresh spot nearby, making sure it’s secure. Cover the nail head with another dab of sealant for extra protection.
- For a Cracked Vent Boot: If the rubber boot is the problem, you have two options. For a quick fix, you can clean the boot thoroughly and cover the cracked area with roofing sealant. For a more permanent solution, you'll want to replace the entire vent boot flashing—a process that's very similar to replacing a shingle.
These DIY repairs can save you hundreds of dollars. But they all have one thing in common: they happen near the edge of your roof, which is directly connected to your gutter system. Often, clogged gutters are the hidden cause of water backing up under your shingles. Before you start any repair, it's always smart to make sure your gutters are clear. Our guide on how to clean gutters safely has some essential tips.
Being prepared with the right materials is half the battle. Here is a quick look at what you'll need for these common repairs and what you can expect to spend.
DIY Repair Materials and Estimated Costs
Before you head to the hardware store, it helps to have a shopping list and a rough budget in mind. Here are the common tools and materials you'll need for most basic roof leak repairs.
| Asphalt Shingles | Replacing individual cracked or missing shingles. | $30 - $40 per bundle |
| Roofing Sealant/Cement | Sealing flashing, nail heads, and shingle edges. | $8 - $15 per tube |
| Galvanized Roofing Nails | Securing shingles and flashing. | $10 - $20 per box |
| Flat Pry Bar | Lifting shingles and removing nails. | $10 - $25 |
| Utility Knife | Trimming shingles or cutting materials. | $5 - $15 |
| Caulking Gun | Applying roofing sealant evenly. | $10 - $20 |
| Wire Brush | Cleaning old sealant and debris from flashing. | $5 - $10 |
As you can see, the material costs are pretty reasonable, especially when you consider what you're saving in labor. Having these items on hand can turn a stressful leak into a manageable afternoon project.
When It’s Time to Call in the Pros
Look, I’m all for a good DIY project. But when it comes to your roof, knowing your limits is probably the most important skill you can have. Some roofing jobs are just too big, too dangerous, or too complicated for a weekend warrior with a caulk gun.
Pushing your luck on a major roof problem can quickly turn a manageable repair into a catastrophe, costing you way more in the long run and putting your safety on the line. Recognizing the signs that scream "call a professional" is key to protecting your home and yourself.
The Red Flags You Can’t Ignore
If you spot any of these during your inspection, it’s time to hang up the tool belt and pick up the phone. These aren't just minor issues; they're symptoms of a much bigger, more systemic problem.
- Widespread Shingle Damage: One or two cracked shingles? You can probably handle that. But if you see a whole section of shingles that are curling up, buckling, or shedding their protective granules like crazy, that’s a sign of widespread failure. It often means the underlayment is shot or the shingles are simply at the end of their life.
- A Sagging Roof Deck: This is a big one. If you're walking on your roof and feel soft, spongy spots under your feet, get off immediately and safely. That’s a terrifying sign that the underlying roof decking is rotting away. Water has been getting in for a long time, compromising the very structure that holds your roof up.
- The Leak That Won’t Quit: Have you patched the same spot over and over, only for that frustrating drip to return after the next big rain? A stubborn leak like that is a classic sign that you’re only treating a symptom. A pro has the tools and, more importantly, the experience to trace that water back to its true source.
Calling a professional isn’t giving up; it’s making a smart, strategic move to protect your biggest asset. Ignoring major warning signs like a sagging roofline can turn a repair job into a full, and very expensive, roof replacement.
The Elephant in the Room: Safety
Beyond the complexity of the work, you have to be brutally honest with yourself about the risks. According to the Bureau of Labor Statistics, falls from roofs are a leading cause of fatalities in the construction industry. The danger is very real.
You should seriously consider calling a pro if:
- Your roof has a steep pitch (anything over a 6/12 slope gets tricky fast).
- The roof is two or more stories high.
- You don't own the right safety gear, like a harness, fall protection system, and a properly secured ladder.
Here in Upstate South Carolina, our humidity and frequent downpours make roofs incredibly slick. Algae and moss love this climate, and they can create a slippery film that even seasoned roofers treat with extreme caution. If you feel even a hint of hesitation, don’t take the chance.
How to Find a Good Local Contractor
Once you've decided to hire someone, the next challenge is finding a roofer you can trust. In the Greenville, Spartanburg, and Anderson areas, you need someone who gets how our local climate—from humid summers to sudden thunderstorms—affects roofing materials.
Start by asking neighbors and friends for recommendations. Then, do your own homework. The absolute non-negotiables are that they must be licensed, bonded, and insured. Check their reviews on Google and the Better Business Bureau to see what past customers are saying.
When you get estimates, don't just look at the bottom-line price. A legitimate quote will be itemized, breaking down the costs for materials, labor, and warranties. Ask them direct questions like, "What kind of underlayment do you plan to use?" or "How will you protect my bushes and siding during the repair?" Their answers will tell you a lot about their professionalism.
Finally, a truly great contractor sees the big picture. They know that a roof is part of a larger system. For instance, recurring leaks around the eaves aren't always a shingle problem; they're often caused by clogged or failing gutters. That’s why understanding how well-maintained seamless gutter systems are critical to protecting your entire roofline. A real pro diagnoses the whole situation, not just the obvious leak.
Of course. Here is the rewritten section, crafted to sound completely human-written and natural, following the provided style guide and examples.
Common Questions About Stopping Roof Leaks
Once you’ve tracked down the source and slapped on a patch, you’re often left with more questions than answers. It’s totally normal. A roof is a complex system, and every leak seems to have its own personality.
Think of this as your quick-reference guide for the questions we hear all the time from homeowners. We’ll tackle a few key topics to give you clear, direct answers and help you know what to expect.
How Long Does a Typical Roof Leak Repair Take?
This is the big one, and the honest answer is: it depends entirely on the problem and who’s doing the work. The timeline can swing wildly.
For a simple DIY fix—like sealing a popped nail head or swapping out a single cracked shingle on a nice, dry day—you could be done in under an hour. But if you're tackling something more involved, like replacing the flashing around your chimney, a dedicated homeowner should probably set aside a good 3 to 4 hours from setup to cleanup.
When you bring in a professional, their experience and efficiency really change the game.
- Minor Repairs: A pro can often knock out a compromised pipe boot or a few bad shingles in just 1 to 2 hours.
- Major Repairs: Something more serious, like replacing the flashing in a roof valley or cutting out a section of rotted decking, can take anywhere from a half-day to a full day on the job.
Keep in mind, weather is the ultimate boss here. Nobody can (or should) work on a wet roof, so a project might get paused until things are safe and dry.
Can a Roof Leak Fix Itself?
Let’s get this out of the way immediately: absolutely not. A roof leak will never fix itself. In fact, it's a guarantee that it will only get worse, even if it seems to stop for a while.
Some leaks are sneaky. They only show up when the wind and rain hit your house from a very specific direction. This can trick you into thinking the problem disappeared, but the entry point is still there, just waiting for the next storm to align perfectly.
The longer you let a leak go, the more damage it’s doing behind the scenes. That tiny drip is busy saturating insulation, rotting the wooden structure of your roof, and creating the perfect environment for mold inside your attic and walls. It turns a simple fix into a massive, expensive restoration project.
Acting fast is always the cheapest and smartest move.
What Are the Signs of a Hidden Roof Leak?
Not every leak makes a grand entrance with a drip in your living room. Most start small and stay hidden, so you have to know what to look for besides an obvious water stain on the ceiling. Keep an eye out for these more subtle clues.
- A Musty Odor: If an upstairs room or your attic has a persistent, earthy smell, that’s a classic sign of hidden moisture and potential mold.
- Faint Wall Discoloration: Look for faint, brownish streaks or stains running down your walls, especially in corners or where the wall meets the ceiling.
- Peeling or Bubbling Paint: When moisture gets into drywall from behind, it pushes the paint away, causing it to bubble, blister, or peel.
- Spongy Attic Floor: If you're up in the attic and the decking feels soft or gives under your feet, that’s a huge red flag for long-term water damage and rot.
How Much Does It Cost to Replace Chimney Flashing?
Replacing the flashing around a chimney is one of the most common jobs we do. It’s a notorious failure point on a roof, and getting it right requires real precision. While prices will vary based on where you live and the complexity of your chimney, a professional replacement typically costs between $300 and $1,200.
What pushes the price up or down? The chimney's size, your type of roofing material, and whether we find any rotted wood decking underneath that also needs to be replaced. This is one of those jobs where paying for professional expertise is well worth it to get a permanent, watertight seal you don’t have to worry about again.
Navigating roof repairs can be a challenge, but you don't have to do it alone. If you're facing a leak that's beyond a simple DIY fix, or if you want the peace of mind that comes with professional craftsmanship, the team at Atomic Exteriors is here to help. We provide expert assessments and lasting solutions for homeowners throughout Upstate South Carolina. Get your free, no-obligation estimate today!