Master Backyard Drainage System Installation For Lasting Results
Managing backyard runoff means steering rainwater safely away from patios, walkways, and foundations before it pools and causes headaches. Surface grading, trench drains, and infiltration solutions all play distinct roles in keeping your yard dry and your home protected.
Quick Overview Of Backyard Drainage System Options
Picking the right approach depends on three key factors: soil type, yard slope, and how hard it rains.
On clay-heavy properties, water tends to sit on the surface—so you’ll need something that moves moisture below ground. Sandy or loamy soils drain quickly, making gentle grading or a dry well often the simplest fix.
Here are the most common options homeowners choose:
- Surface Grading shifts topsoil away from structures, preventing puddles within hours.
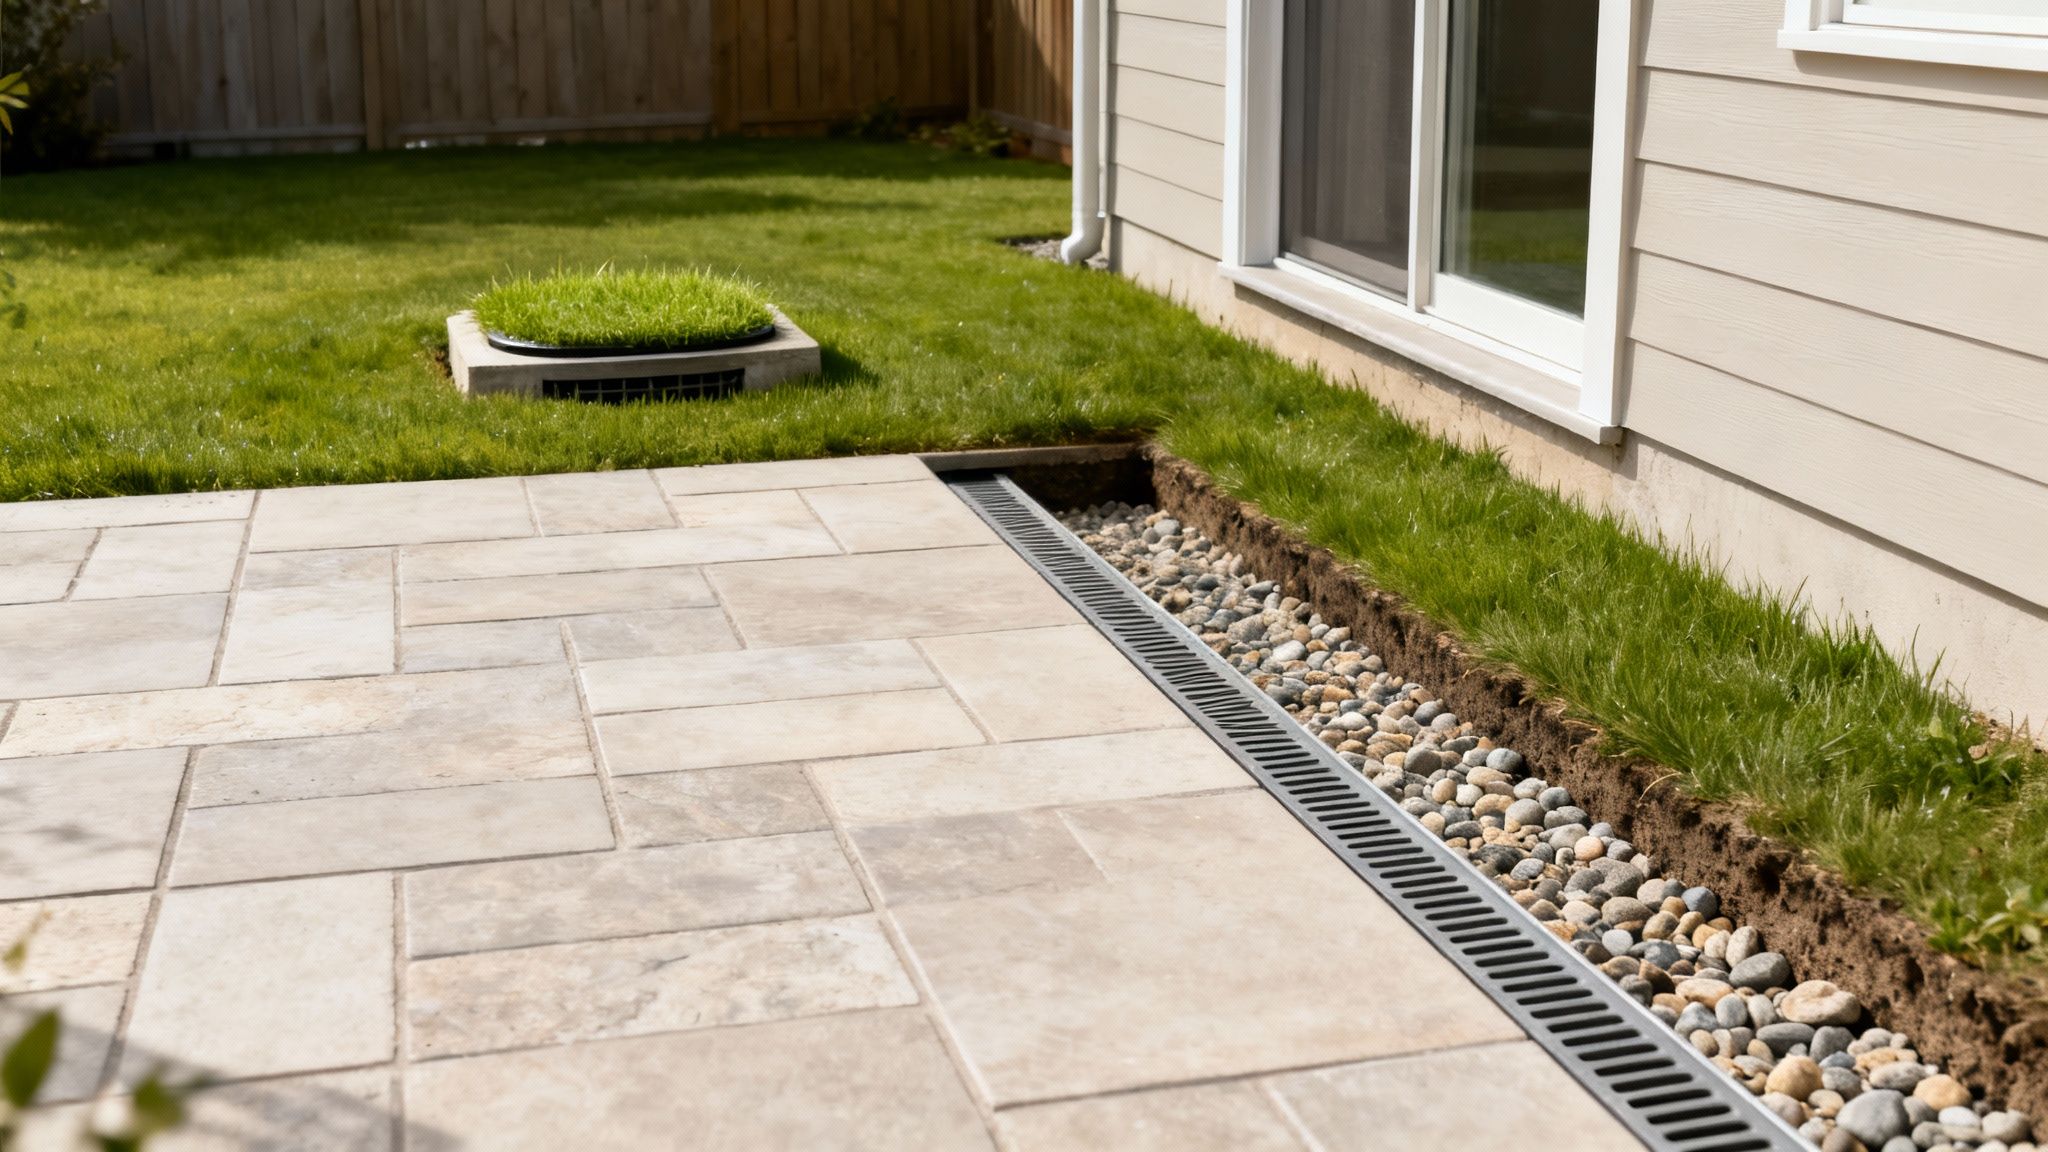
- Channel Drains (trench drains) sit along patios or driveways, snagging runoff instantly.
- French Drains combine perforated pipe and gravel to whisk water underground.
- Dry Wells store excess in buried chambers, perfect for deep infiltration.
- Rain Gardens use plants and amended soil to soak up and filter water naturally.
Comparison Of Backyard Drainage System Options
Below is a snapshot of each solution, where it shines, typical investment, and the main takeaway:
| Surface Grading | Gentle slopes | $200–$800 | Prevents surface pooling |
| Channel Drains | Hardscape perimeters | $50–$150/ft | Captures runoff quickly |
| French Drains | Foundation edges | $20–$40/ft | Moves water below grade |
| Dry Wells | Deep infiltration zones | $500–$2,000 | Holds large volumes |
| Rain Gardens | Natural filter areas | $300–$1,200 | Eco-friendly absorption |
Matching your soil and slope to the right system can save time and money on installation.
Thinking about gutters? The right downspout setup can make or break your drainage strategy. Learn more about gutter options in our gutters comparison guide.
Application Tips
- Always set drain pipes at a 1%–2% grade to keep water flowing.
- Wrap French drains in geotextile fabric so fine particles don’t clog the system.
- Position dry wells at least 10 feet from any foundation to protect your footing.
In Upstate South Carolina, permits often come into play—check with local authorities before you dig. Typical installation expenses run from about $500 for straightforward grading to $4,000 for more extensive subsurface networks.
In the next section, we’ll walk through DIY versus professional installation steps so you can tackle this project confidently—or know exactly when it’s time to call in an expert.
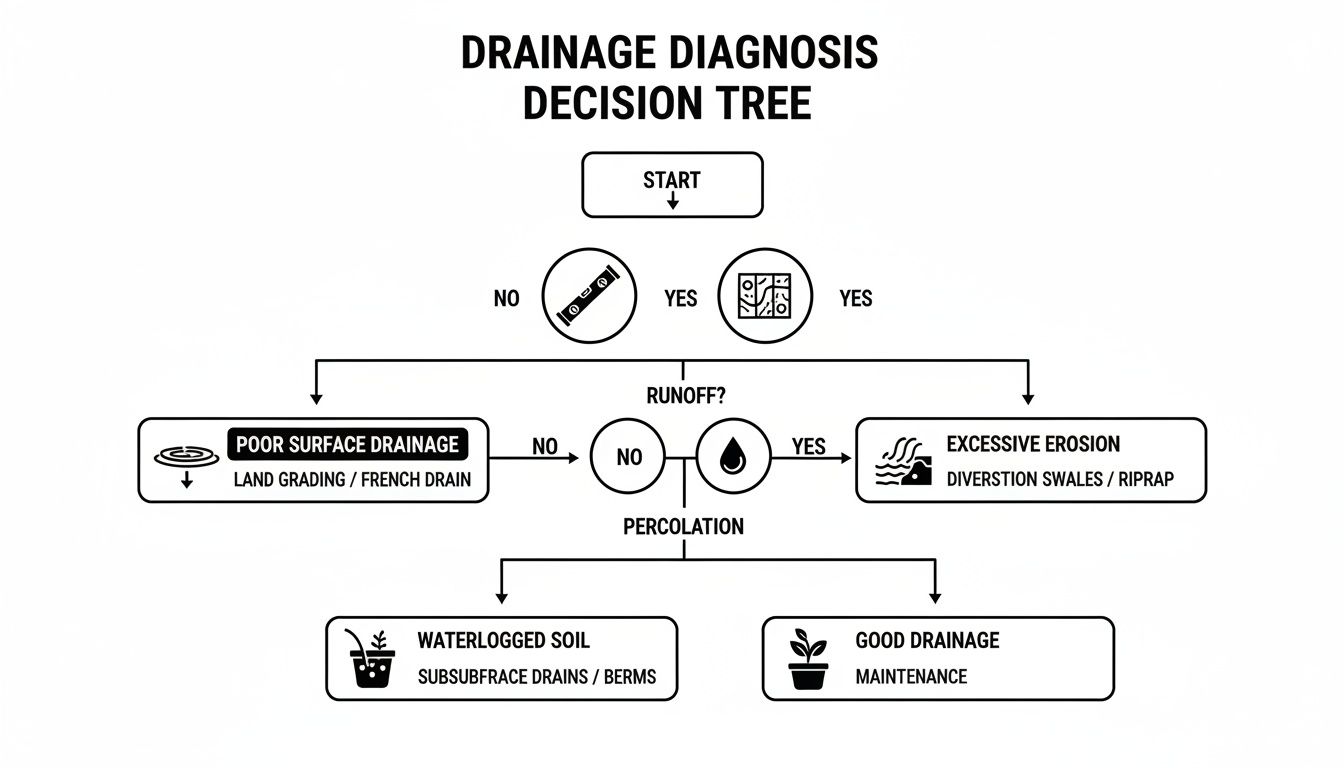
Diagnosing Backyard Drainage Problems
Before you start moving dirt or laying pipes, you need a clear picture of what’s really happening in your yard. The best time to diagnose is right after a heavy rain, when every puddle and trickle stands out.
Right after a downpour, stroll through your outdoor space and jot down where water lingers and how long it sticks around.
- Use a 6-foot level and stakes to verify at least a 2% slope away from buildings.
- Trace runoff during rainfall to spot hidden flow paths around patios, sheds, or beds.
- Dig small test holes in several spots and watch how fast water soaks in.
Sarah discovered a clogged downspout behind her shed that had been diverting water straight into her flower bed. Once she cleared out the leaves and pine needles, the erosion stopped almost immediately.
Mark faced something subtler—a barely noticeable dip toward his vegetable garden. By adding soil and tweaking that grade by just 2%, he banished standing water within days.
Key Clues In Soil And Surface
Dark, soggy turf often points to soil that simply can’t drain. Moss thriving in shady hollows? That’s your most obvious hint of chronic wet conditions.
“Persistent wet spots don’t lie – follow the moss to find hidden water channels.”
If patches stay marshy longer than 48 hours, it’s time for a closer look at slope and soil absorption.
Conducting A Percolation Test
A quick percolation check shows you exactly how thirsty—or impermeable—your soil is. Most homeowners can tackle this with common garden tools.
- Dig a hole roughly 12 inches deep and 12 inches wide at a low spot.
- Fill it with water and let it drain fully.
- Refill and time how long it takes the water level to drop 6 inches.
If the water recedes in under 1 hour, your soil drains well. If it lingers beyond 4 hours, you’re probably dealing with heavy clay that needs different tactics.
Mapping Runoff Paths
Sketch a rough layout of your yard after the next rainfall. Seeing where water converges or pools helps you decide where drains or swales should go.
- Spray chalk lines on hard surfaces to outline flow.
- Plant colored flags at dips and hollows in lawns and planter areas.
- Attach waterproof tape to stakes marking the main water routes.
While you’re fine-tuning grading, don’t forget roof runoff can add to the problem. Check out our guide on stopping roof leaks (https://atomicexteriors.com/blogs/how-to-stop-roof-leaks).
Keep an eye out for these visual cues:
- Deep water rings around pots and holes—slow percolation in action.
- Moss patches in shaded dips, marking permanent puddles.
- Soft, muddy ground hinting at perched water tables or underground blockages.
Reading these signs gives you a precise map for your drainage plan. Once you’ve completed this site audit, you’ll skip the guesswork and move straight into comparing the most practical drainage solutions for your yard.
Comparing Common Backyard Drainage Methods
Pinpointing soggy zones in your yard is just the first step. Next, you’ll want to weigh each solution by installation complexity, speed of drainage, and how well it suits your soil type.
Here’s a quick look at five popular methods—from underground pipes to gentle regrading—and how slope, runoff volume, and percolation rates steer your choice.
On steeper pitches, surface channel drains shine. In clay-heavy yards where water struggles to soak in, deeper sub-surface options often win out.
Method Overviews
Each approach varies in tools, time investment, and DIY feasibility:
- French Drain Combines perforated pipe, gravel, and geotextile fabric to whisk water underground.
- Gravel Trench Involves a shallow, lined trench filled with washed gravel—ideal for moderate runoff.
- Dry Well A deep pit collects excess water, letting it seep away slowly without harming landscaping.
- Channel Drain Prefabricated grate assemblies sit flush on patios or driveways to capture surface flow.
- Strategic Regrading Shifting soil to craft a slight slope that directs water naturally away from foundations.
Cost And Performance Comparison Of Drainage Methods
Below is a snapshot to help you balance budget, maintenance, and lifespan when choosing your system.
| French Drain | $20–40 per foot | Annual inspection | 25–50 years |
| Gravel Trench | $15–30 per foot | Every two years | 20–30 years |
| Dry Well | $500–$2,000 total | Every three years | 20–40 years |
| Channel Drain | $50–150 per foot | Semiannual cleaning | 15–25 years |
| Regrading | $200–800 total | One-time regrade | Depends on soil |
This table highlights how upfront costs and upkeep vary. With those figures in hand, you can zero in on the drain that fits your yard and wallet.
Real-World Application
A homeowner in Columbia tackled standing water under a mature oak by installing a French drain. They spent roughly $3,200 for professional labor and materials, which falls in the $1,500–4,500 range for an average lot. Working around roots added nearly 30% to the restoration budget but kept the tree intact.
Key takeaways from this project:
- Match drainage method to your soil’s percolation rate.
- Factor in specialized equipment before committing to a DIY route.
- Always schedule service checks at the recommended intervals.
- Combine yard solutions with roof management for a seamless system.
Read the full research about modern drainage system market
Integrating With Gutters
Pairing your yard drains with a solid gutter upgrade keeps roof runoff from overwhelming any single system. Explore how seamless gutters can fit into your plan: Cost of Seamless Gutters
Local Tips For Upstate South Carolina
- Keep an eye on seasonal rainfall trends—spring storms in Greenville can be especially heavy.
- Lay out drainage paths before planting, so roots and beds aren’t disturbed later.
- Check with your county’s building department to confirm any permit requirements.
By lining up soil type, slope, and budget—then reviewing maintenance and local weather patterns—you’ll land on a backyard drainage solution that keeps water moving off your property for good.
Planning Your Backyard Drainage Project

Before you pick up a shovel, step back and map your property with stakes and string. Sketching out flow lines helps you spot those dips that turn into mini ponds. When you calculate slope—typically 1%–2%—water reliably drifts away from your home.
Don’t skip the paperwork. In many Upstate SC towns, trenches over 200 feet trigger a permit, and HOA guidelines can ban visible drain runs. Laying out your plan against local setback rules saves headaches down the road.
- Property Sketch: Identifies low spots and high points
- Slope Measurement: Ensures reliable runoff at 1%–2% grade
- Permit Checklist: Keeps you compliant and out of fines
Selecting Materials For Your Drainage
Choosing the right components makes a lasting system, not a seasonal fix. A homeowner in Simpsonville relied on 4-inch perforated pipe to swallow spring storms without backup. Wrapping that pipe in ¾-inch to 1½-inch gravel and geotextile fabric stops soil from sneaking in.
- Pipe Diameters: Match flow volume and seasonal peaks
- Gravel Grades: ¾-inch to 1½-inch blends add trench stability
- Geotextile Fabrics: Block fine particles and preserve water flow
One DIYer I know hit an HOA wall on surface swales. He solved it with under-deck channels that stay hidden—and they’ve survived two heavy summers without a hitch.
Proper material choice can extend system life by up to 30 years and avoid costly repairs.
Budgeting And Scheduling
Setting a realistic budget early prevents mid-project sticker shock. Break expenses into materials, labor (or your own hours) and permit fees. I always include a 15% contingency for surprises—think unexpected rock layers or soggy soil.
- Material Costs: Pipes, gravel, fabric, connectors
- Labor Estimates: Compare local contractor quotes or value your DIY time
- Permit Fees: Town hall and HOA review charges
| Site Mapping | 1 day | $50–$150 |
| Material Ordering | 2–3 days | $300–$700 |
| Installation | 1–5 days | $500–$2,500 |
| Final Inspection | 1 day | $0–$100 |
Right now, the global drainage market sits near USD 50.3 billion, moving at a 6.5% CAGR through 2035. For deeper insights, check out these drainage system market findings.
With this blueprint in hand, you can line up materials, book your crew—or decide if Atomic Exteriors should tackle the install. Next, we’ll dive into DIY vs. professional installation so you pick the right path.
DIY Versus Professional Installation Guidance
Deciding whether to spend your Saturday rerouting runoff yourself or ring up a licensed installer comes down to matching the job’s demands with your skill set. Simple fixes—like regrading a low spot in the yard or snapping in a surface channel drain—can make for a satisfying DIY weekend. Yet when you’re talking precise 1%–2% French drain grades or drilling deep infiltration wells, professional expertise is often a must.
Below, you’ll find a side-by-side look at costs, permit considerations, and a quick vetting checklist to help you choose between grabbing the shovel or making the call.
- DIY Tasks You Can Tackle • Minor soil regrading to redirect water away from patios • Installing surface channel drains along hardscapes • Clearing out shallow dry well chambers
- Professional Tasks • Calculating an exact 1%–2% pipe slope for a French drain • Drilling infiltration wells deeper than 6 feet • Managing permit applications and final inspections
A real-world example: a homeowner in Simpsonville pocketed over $1,000 by installing a channel drain. A tiny 2% slope error, though, sent water back toward the foundation. That quick weekend save turned into a contractor-led regrade—and a far more reliable system.
When DIY Makes Sense
If you’re comfortable with a level, shovel, and tamper, tackling simple regrading can be rewarding. Moving 1–2 cubic yards of soil per 100 square feet usually creates that needed 1%–2% fall. A trench channel kit runs about $20–30 per foot, and most installs wrap up in a day.
Gather these basics before you dig in:
- 6-foot level and stakes for slope checks
- Sturdy shovel, hand tamper, and marking paint
- Protective gloves and eye protection
“A weekend project saved me $1,000, but dialing in that precise slope was tougher than I thought. A pro’s fine tune made it last.”
However, if your yard hides uneven subgrades or clayey spots, basic gear may leave you stuck. Handling deeper trenches, geotextile wrapping, and stable outlets can turn a few hours into days. That’s when a pro’s laser level and construction-grade tools pay off.
Expect professional bids for a French drain on an average lot to start around $1,500 and climb to $4,500, depending on length and soil conditions. Their service often includes trench laser leveling, backfill compaction, and permit coordination.
When To Hire A Contractor
Licensed installers bring insurance coverage and warranty backing that DIY jobs simply lack. In Upstate South Carolina, they also know the ins and outs of zoning setbacks and permit rules.
Before you sign, make sure to:
- Verify a valid license and proof of insurance
- Request references for similar backyard drainage projects
- Compare written estimates, timelines, and warranty terms
Learn more about licensed backyard drainage installation in our professional services at Atomic Exteriors for free estimates. They’ll handle grading verification, pipe layout, and final inspection sign-off—so you get a reliable system and lasting peace of mind.
Maintenance And Troubleshooting Tips
Once your backyard drainage is up and running, a few simple checks each season will keep water flowing freely. Start by clearing inlet points of leaves or sticks before heavy rains hit—this small effort goes a long way.
Flushing the main lines with a garden hose helps you uncover hidden blockages. And don’t forget to peek at the outlets: any trapped debris can slow the entire system.
- Winter: Cover inlets to prevent ice buildup
- Spring: Flush out settled sediment
- Fall: Remove moss and leaves from grates and trenches
A neighbor of mine pried open his grates, cleared away moss, and cut his cleaning time in half. It’s a quick weekend trick that fits into any busy schedule—and keeps things draining smoothly.
Seasonal Inspection Checklist
Keep this short list handy:
- Inspect grate covers for cracks or warping
- Survey outlets and trench ends for signs of erosion
- Clear sediment from catch basins and troughs
Spotting issues early makes all the difference. If water lingers on the surface or new puddles appear, address them before small annoyances turn into big repair bills.
Troubleshooting Common Issues
When flow slows, dig a shallow test hole beside the trench to see if sediment or roots are causing a backup.
- Minor pooling? Regrade the area for proper slope
- Clogged grate? Rinse it under running water
- Torn filter fabric? Swap in a fresh geotextile strip
In many well-built systems, perforated PVC pipe and gravel envelopes wrapped in filter fabric last 25–50 years. Skip maintenance and clog rates can spike 2–3× in the first decade. Scheduling an annual cleanout—and a professional inspection every five years—can trim lifetime costs by 20–40%. You can read more about these figures at Future Market Insights
Regular tune-ups extended my French drain’s life past 30 years and kept my yard bone-dry through heavy storms.
When To Call A Professional
Some problems demand expert attention. Reach out if you notice:
- Standing water lingering beyond 48 hours
- More than 6 inches of sediment in trenches
- Cracks or separations at pipe joints
Learn proactive gutter maintenance by checking out our guide on safe gutter cleaning (https://atomicexteriors.com/blogs/how-to-clean-gutters-safely)
A little annual care goes a long way. Stick to this routine, and your backyard drainage will protect your home for decades to come.
Frequently Asked Questions
What Depth Should I Set My French Drain At? When I installed one last spring, I aimed for 18 to 24 inches below the lawn. Around 20 inches hits that sweet spot—capturing both surface runoff and the moisture lurking in the subsoil. Don’t forget a gentle 1%–2% slope; a laser level and stakes make that simple.
Which Soil Types Benefit Most From Dry Wells? In sandy or loamy yards, water usually clears out within 2 hours, making dry wells a no-brainer. But clay-heavy ground can leave puddles beyond 6 hours unless you tweak the setup.
- Sandy/Loamy Soils: Straightforward backfill with minimal fuss.
- Clay Soils: Wrap the well in geotextile fabric and pack gravel around it for better flow.
“A quick seasonal check means a minor clog won’t turn into foundation damage.”
Can I Connect A Channel Drain Directly To A Storm Sewer? Yes—most Upstate South Carolina towns allow it with the right permit. Use a rigid PVC adapter and sealed couplings to keep everything watertight and code-compliant.
Key Backyard Drainage Questions
How Often Should I Inspect My Backyard Drainage System? Trust me, staying ahead of blockages pays off.
- Spring & Fall: Remove grates and flush out pipes.
- After Heavy Storms: Scan for erosion or silt buildup.
- Every 5 Years: Book a pro for a thorough inspection. Keep a simple log of dates and notes—you’ll spot trends before they become problems.
What Tools Are Recommended For Diagnosing Drainage Issues? Here’s what I never leave the house without:
- A 6-foot level or laser level for accurate slope checks
- Measuring stakes and string to map out grades
- A shovel and hand tamper to dig test holes For a complete walkthrough, check out our site audit guide.
When Should I Hire A Contractor Instead Of DIY? When trenches get deep or you need that precise 1%–2% grading, bring in a licensed pro. They’ll handle permits, insurance, and ensure your job meets Upstate South Carolina codes.
Ready to protect your home? Visit Atomic Exteriors for a free estimate.