How to Fix Leaking Gutters A Practical DIY Guide
That constant drip… drip… drip… isn't just an annoying sound; it's a warning bell. The fastest way to fix a leaking gutter usually starts with cleaning out the section, finding the source—like a cracked seam or a pesky little hole—and applying a high-quality, waterproof gutter sealant. It’s a simple fix that can save you from serious damage to your home's foundation, siding, and landscaping.
Why Fixing Leaking Gutters Should Be Your Top Priority
A dripping gutter might seem like a small annoyance you can put off until next weekend, but ignoring it is a gamble you don’t want to take. Your gutter system is your home's first line of defense against water damage, channeling thousands of gallons of rainwater away from its most vulnerable spots every single year. When a leak pops up, that protective shield is broken.
The consequences of putting it off can be surprisingly severe and expensive. Even a small, steady drip can snowball into major problems that reach far beyond the gutter itself.
The Real Risks of Gutter Leaks
Ignoring a leak lets water run down your home’s exterior, soaking siding and window frames. Over time, this constant moisture causes wood to rot, paint to peel, and can even create the perfect breeding ground for mold and mildew inside your walls.
But the damage doesn't stop there. All that water pooling at the base of your house erodes the soil and can seep into your foundation.
This unwanted moisture can lead to foundation cracks, a flooded basement, and even structural issues that are incredibly costly to repair. What starts as a simple gutter leak can threaten the very integrity of your home.
Your Action Plan for Gutter Repair
The good news? Most common gutter leaks are well within the grasp of a determined homeowner. This guide is designed to give you a clear, actionable plan—no fluff, just practical solutions. We'll go beyond just spotting the problem and dive into how to fix it with confidence using three core methods:
- Sealing: This is your go-to for small leaks at joints and seams where gutter sections connect.
- Patching: The perfect solution for larger cracks or holes caused by falling branches or corrosion.
- Realigning: Sometimes the problem isn't a hole at all. When gutters sag or have the wrong slope, water pools up and spills over the edge.
Properly managing water runoff is a critical part of home maintenance. If you’re dealing with persistent water issues in your yard even after your gutters are fixed, it might be time to explore a comprehensive backyard drainage system. It’s the next-level solution that works hand-in-hand with your gutters.
So, before you grab your ladder, think of this guide as your pre-repair briefing. It’ll make sure you're prepped and ready for the task ahead.
Finding the True Cause of Your Leaking Gutters
Before you even think about grabbing sealant or setting up a ladder, the most important thing you can do is play detective. A successful gutter repair comes down to one thing: knowing exactly what you're fixing. Guessing at the source of a leak is a recipe for doing the same job twice, while a little bit of diagnosis upfront sets you up for a permanent solution.
It's easy to jump to conclusions. You see a drip at a joint and assume the seam is bad, but the real culprit could be a clog ten feet up the line that’s causing water to back up and spill over the edge. Getting this part right is half the battle.
Your Initial Ground-Level Inspection
The best place to start is safely on the ground. Take a walk around your house while it's raining (or right after) to see your gutters in action. This is often the simplest way to spot where water is escaping.
Keep an eye out for these obvious red flags:
- Visible Overflow: Is water pouring over the sides like a waterfall? That’s almost always a sign of a clog from leaves, pine needles, or other gunk.
- Water Stains: Look for dark streaks or peeling paint on the fascia boards and siding right under the gutters. Those stains are the ghost of a persistent, slow leak.
- Dripping Joints: Pay close attention to the seams where two gutter sections meet and at the corners. These are the usual suspects.
- Sagging Sections: Do any parts of the gutter look like they're bowing in the middle or pulling away from the house? A sagging gutter creates a low spot where water pools and eventually spills.
This quick walk-around will give you a solid idea of your problem areas, so you know exactly where to focus when you get up on the ladder.
Simulating Rain for a Precise Diagnosis
If you're stuck with a dry day, you can make your own rainstorm with a garden hose. This is a fantastic trick for pinpointing those small, sneaky leaks that are hard to spot otherwise.
Get a helper to stay on the ground while you safely position your ladder at the far end of the gutter, opposite the downspout. Turn the hose on—you're aiming for a gentle flow, not a fire hose—and let the water run down the trough. From below, watch as the water makes its way toward the downspout.
Pro Tip: The second you spot a drip, have your helper mark the exact location on the underside of the gutter. A small piece of brightly colored duct tape or even a crayon works perfectly. This simple move saves you the headache of trying to find that tiny pinhole later on.
This flowchart can also help simplify the process of figuring out the problem and picking the right fix.
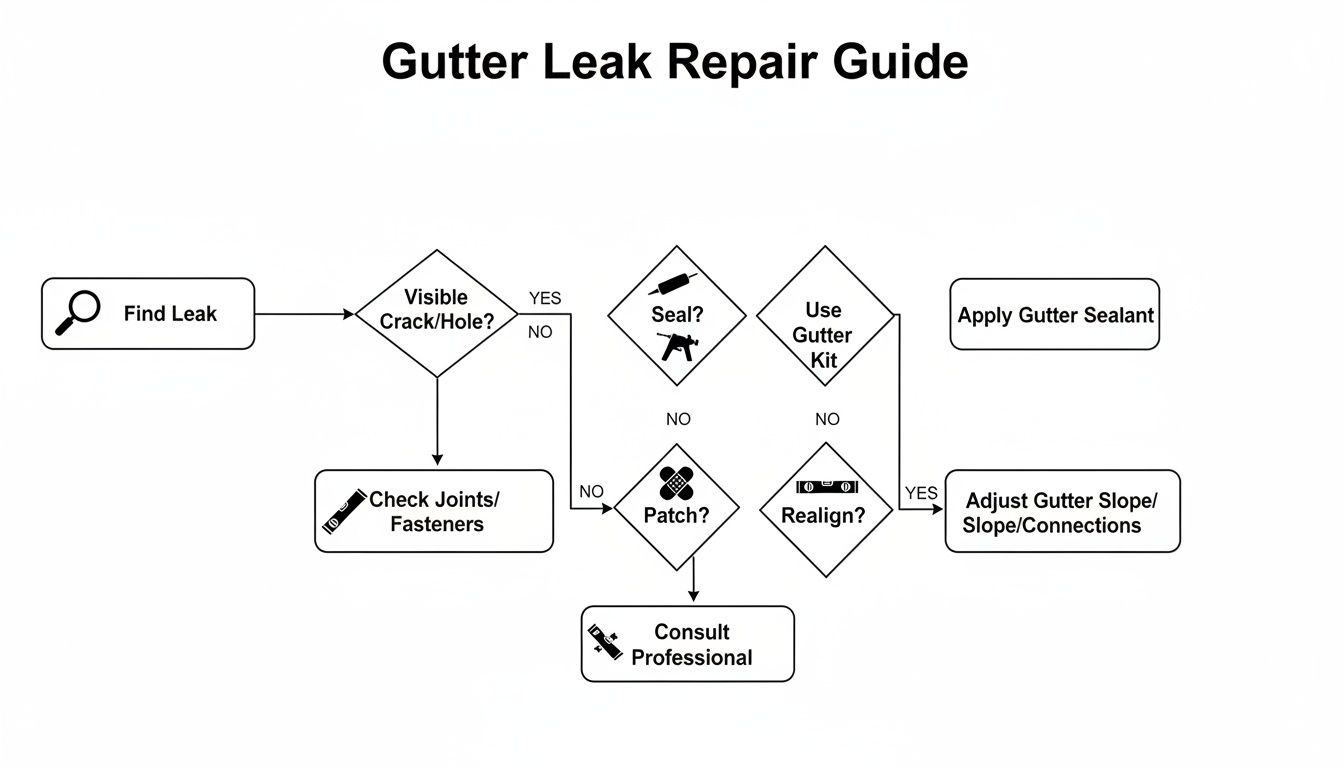
It’s a great visual for moving from finding the leak to deciding whether sealing a joint, patching a hole, or realigning a section is the best move for your situation.
Common Gutter Leak Culprits
Once you know the general location of the leak, it's time to zero in on the cause. More often than not, it’s one of these offenders:
- Separated Seams: The sealant holding the joints together where two gutter sections meet simply doesn't last forever. Years of sun and changing temperatures cause it to degrade and fail. This is a classic problem with traditional sectional gutters; you can see why by checking out our guide on seamless gutters vs regular gutters.
- Cracks and Holes: A falling branch or simple corrosion can create small cracks or pinholes. They might look tiny, but they can let a surprising amount of water drain out.
- Incorrect Slope (Pitch): Gutters are designed with a very slight downward slope toward the downspout to keep water moving. If that pitch is off, water just sits there, eventually causing corrosion or overflowing when it rains hard.
- Clogged Gutters: This is, without a doubt, the #1 cause of water going where it shouldn’t. When your gutters are packed with debris, rainwater hits a dam and has nowhere to go but over the side, which looks just like a leak.
Gathering Your Gutter Repair Tools and Materials
There’s nothing worse than getting halfway through a project only to realize you’re missing a crucial tool. Walking into a hardware store without a clear plan is a recipe for frustration and multiple trips back.
Before you even think about climbing that ladder, let's get you set up for success. Having every tool and material ready will make the job smoother, safer, and far more effective. Think of this as your pre-flight checklist; a little organization now prevents big headaches later.
First Things First: Safety Gear
Working at height is no joke, so safety is absolutely non-negotiable. The single most important piece of equipment you'll use is a sturdy, reliable ladder. I always recommend an extension ladder with a ladder stabilizer (sometimes called stand-off arms). This simple attachment keeps the ladder resting on the roof, not leaning against—and potentially damaging—the gutters themselves.
Beyond the ladder, you'll need a few other essentials:
- Heavy-Duty Work Gloves: Protects your hands from sharp metal edges, screws, and all the gunk you’re about to pull out.
- Safety Glasses or Goggles: You never know what might flick up out of the gutter while you're cleaning or scraping. A little grit in the eye can end your project fast.
- Non-Slip Boots: Good grip is a must for secure footing on the ladder, especially if things get a little damp.
The Prep Work: Cleaning Supplies
You can't fix what you can't see. A clean, dry surface is essential for any sealant or patch to bond correctly. Trying to apply new sealant over old, caked-on grime and wet leaves is a complete waste of time.
Here’s what your cleaning arsenal should include:
- Gutter Scoop or Small Trowel: A specialized scoop makes removing the bulk of leaves and muck much faster and cleaner than using your hands.
- Garden Hose with a High-Pressure Nozzle: After scooping, a powerful spray is perfect for washing away the remaining fine silt and grit.
- Stiff-Bristled Brush & Wire Brush: These are your best friends for scrubbing away stubborn residue and old, failing sealant around the leaky spot.
- A Few Clean, Dry Rags: You’ll need these to completely wipe the repair area dry before applying any new materials.
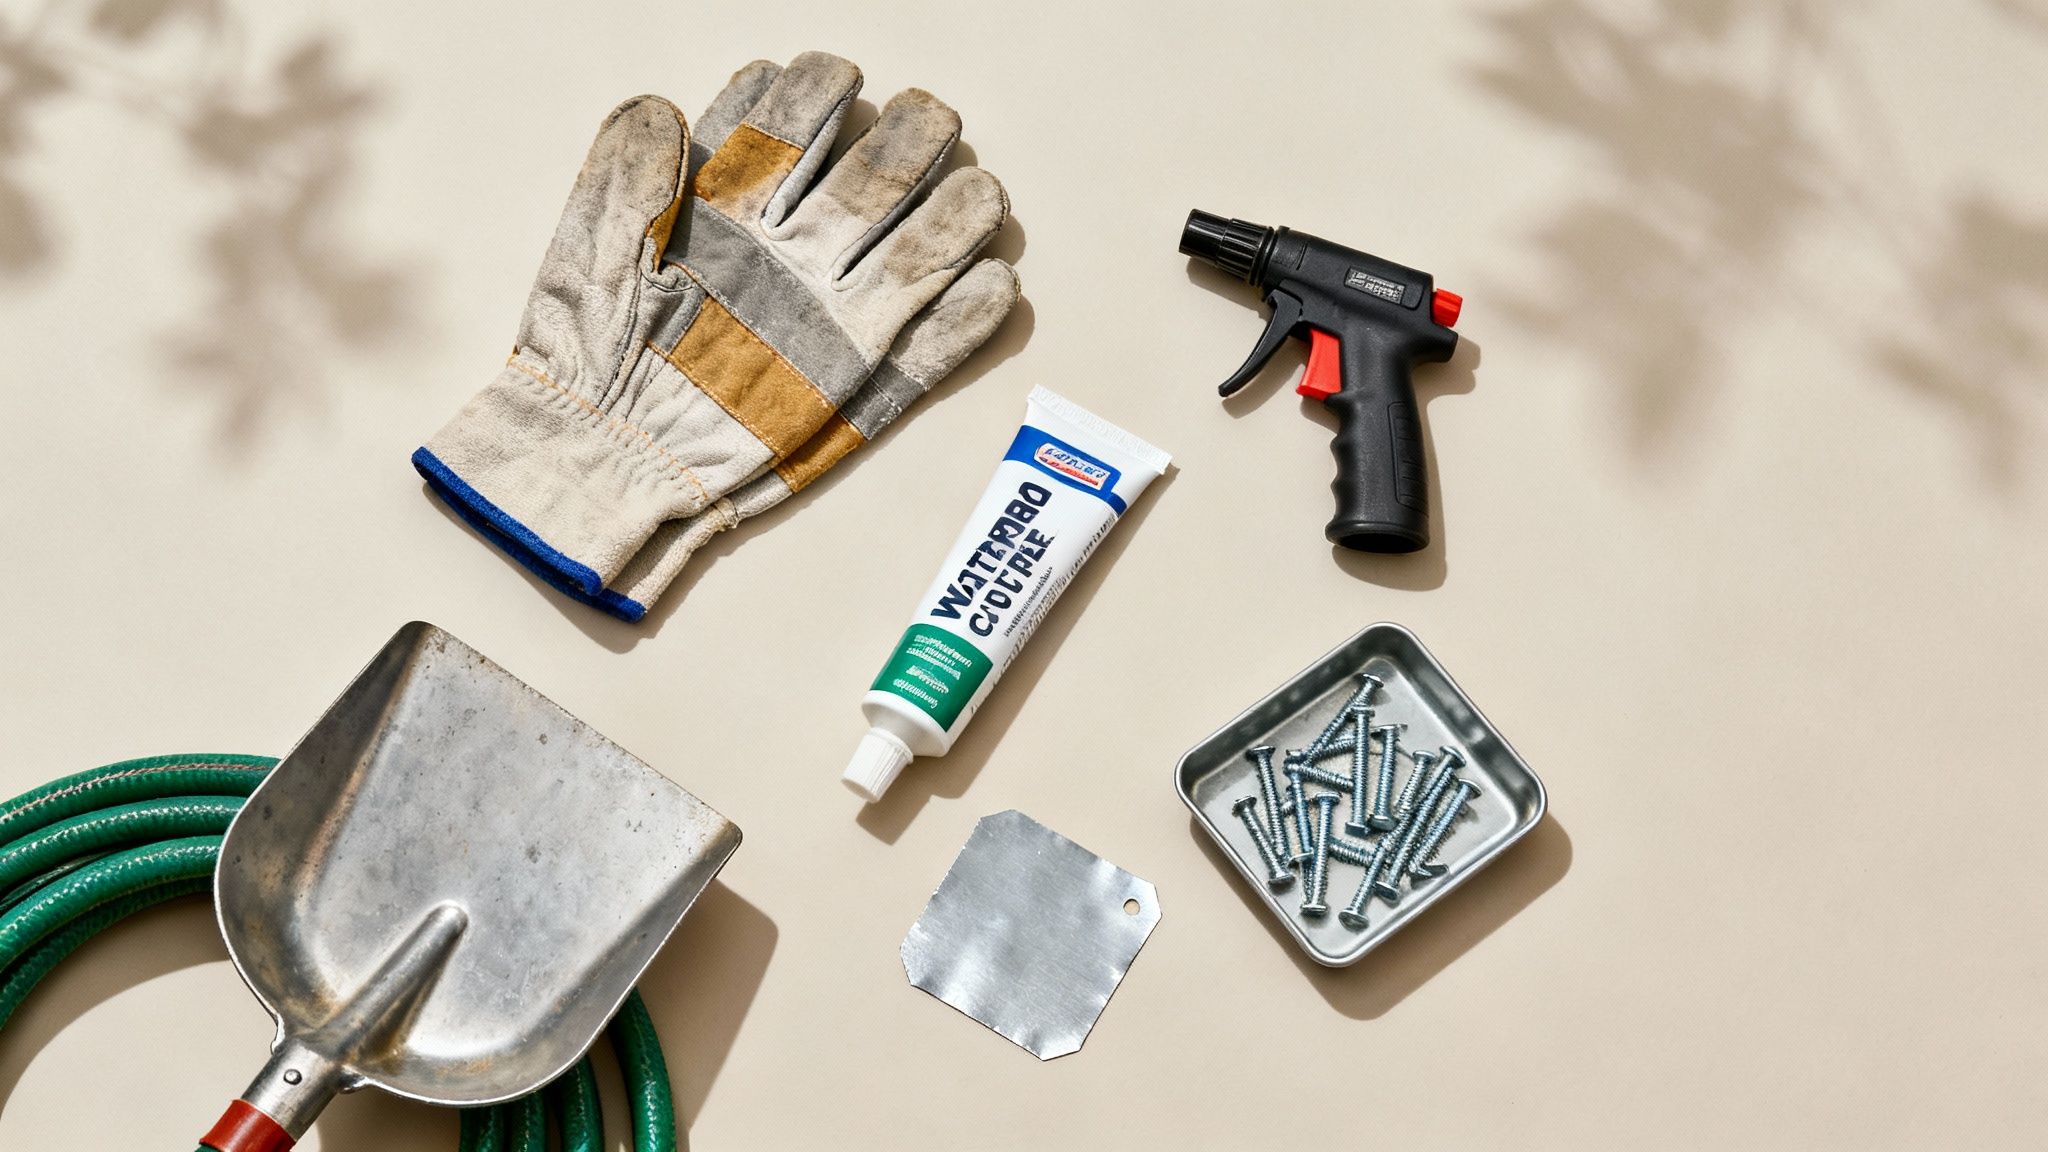
The Main Event: Your Gutter Repair Kit
Alright, with the gutter clean and prepped, it's time to make the fix. The exact materials you'll need depend on the type of leak you diagnosed earlier, but this core kit will cover most common problems you'll run into.
Here's a pro tip from years of experience: Don't just grab any old caulk from the garage. Standard painter's caulk or indoor silicone is not designed for the extreme temperature shifts and constant water exposure gutters endure here in the Upstate. It will fail, and you’ll be fixing the same leak again next season.
To get a lasting repair, make sure your kit has these items:
- High-Quality Gutter Sealant: Look specifically for a butyl rubber or polyurethane-based sealant that is waterproof, weatherproof, and remains flexible. Double-check that it's compatible with your gutter material (e.g., aluminum, vinyl).
- Gutter Patch Kit or Metal Flashing: For larger holes or cracks, a pre-made patch or a small piece of metal flashing provides the structural reinforcement you need.
- Replacement Gutter Screws or Rivets: It’s smart to have a few rust-proof screws or rivets on hand. You'll almost always find a loose hanger or downspout connection while you're up there.
- Caulking Gun: A decent caulking gun gives you much better control for a clean, even bead of sealant, which is key to a truly waterproof seal.
Gutter Repair Toolkit Checklist
To make your trip to the hardware store as efficient as possible, I've put together a simple checklist. Having these items on hand will prepare you for nearly any common gutter leak scenario.
| Safety | Sturdy Extension Ladder | Get one with a ladder stabilizer to avoid damaging your gutters. |
| Heavy-Duty Work Gloves | Leather or rubber-coated gloves offer the best protection. | |
| Safety Glasses | Choose a pair that wraps around to protect from side splashes. | |
| Non-Slip Boots | Look for deep treads to ensure a secure grip on ladder rungs. | |
| Cleaning | Gutter Scoop or Trowel | A plastic scoop won't scratch or gouge aluminum gutters. |
| Hose with High-Pressure Nozzle | An adjustable nozzle lets you go from a gentle rinse to a powerful blast. | |
| Wire Brush & Stiff Brush | A wire brush is for metal; a stiff nylon brush works well for vinyl. | |
| Clean Rags | Microfiber rags are great for soaking up every last drop of moisture. | |
| Repair | Butyl Gutter Sealant | Ensure it’s rated for exterior use and compatible with your gutter material. |
| Gutter Patching Kit/Flashing | For holes larger than a dime, a patch is a must. | |
| Rust-Proof Screws/Rivets | Stainless steel or coated screws will prevent future rust streaks. | |
| Quality Caulking Gun | A dripless model is worth the extra few dollars in saved frustration. |
With this toolkit assembled, you’re no longer just guessing—you’re prepared. Now you're ready to tackle the repair with the confidence of a pro.
Proven Techniques for Repairing Gutter Leaks
Alright, with clean gutters and a good idea of where the leak is coming from, you're ready to get your hands dirty. This is where all that prep work really pays off, turning a frustrating chore into a pretty satisfying fix. We'll walk through the most common repairs I see—sealing seams, patching holes, and shoring up loose hangers—with some real-world advice to make sure your work actually lasts.
The goal here isn't just to stop a drip for a week. It's about creating a solid, durable seal that protects your home season after season. Trust me, rushing the job or grabbing the wrong tube of caulk from the hardware store is a surefire way to find yourself right back up on that ladder after the next big storm.
Mastering the Art of Sealing Gutter Joints and Seams
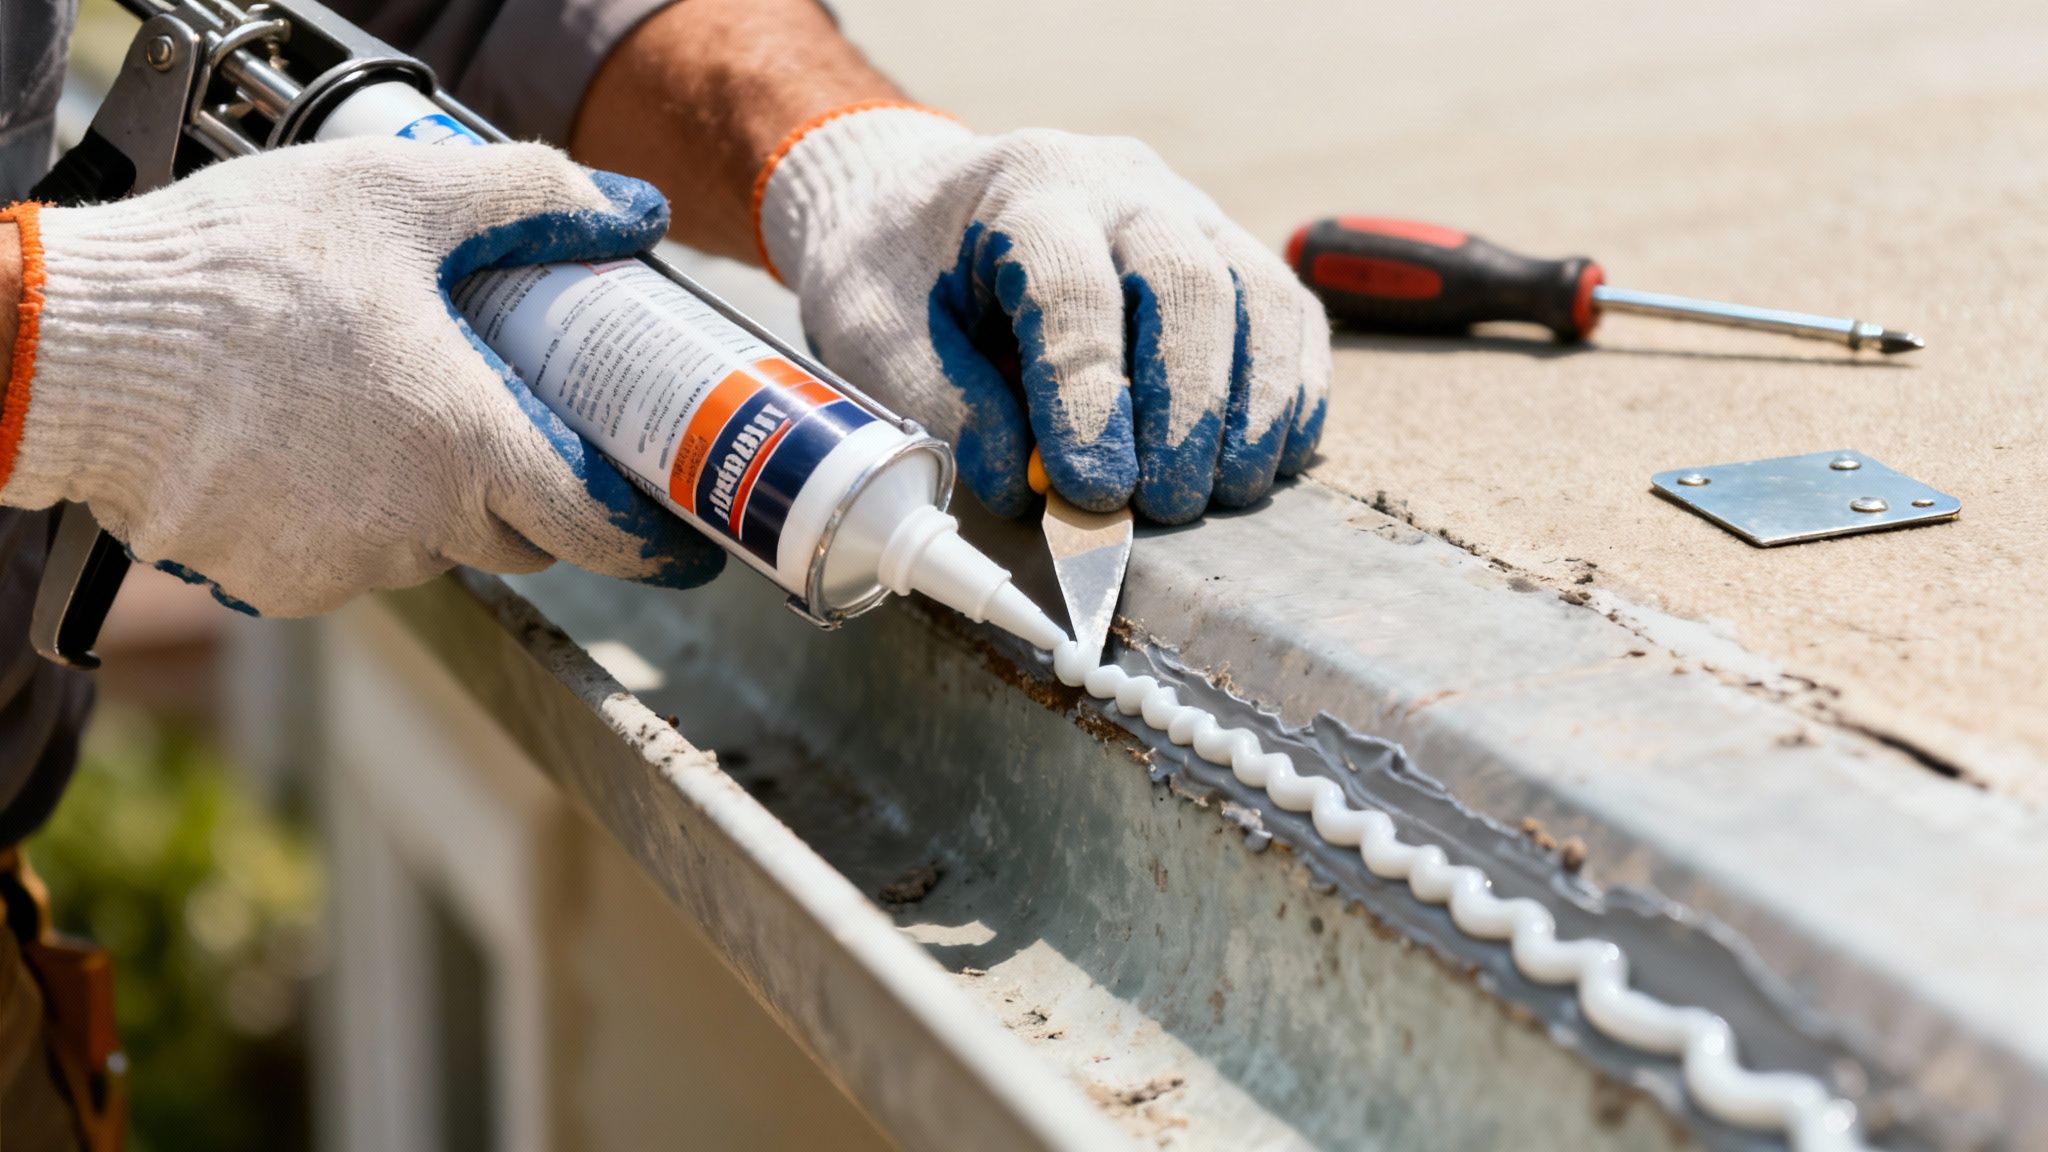
Leaky joints and seams are, without a doubt, the number one problem you'll run into, especially with older sectional gutters. Years of expanding in the summer heat and contracting in the cold cause the original factory sealant to get brittle, crack, and pull away from the metal.
Before you even think about applying new sealant, the surface has to be perfectly clean and bone-dry. Get in there with a wire brush and aggressively scrape out all the old, failing caulk. Scour away any rust or corrosion you find. A quick wipe with a rag and some rubbing alcohol will get rid of any lingering dust and oils, giving the new sealant a pristine surface to grab onto.
Critical Takeaway: Applying new sealant over old, flaky material is the biggest mistake people make. The new stuff will never stick properly, and your leak will be back with the next heavy rain. Take the extra five minutes to prep. It's worth it.
Once it's prepped, lay a generous, continuous bead of a high-quality butyl rubber gutter sealant right over the seam. Use a small putty knife or even your gloved finger to tool the bead, pressing it firmly into the joint. This pushes out any air bubbles and creates a seamless, watertight barrier.
This isn't just a headache for homeowners; it's a huge business. Leaky gutters are a major driver of the global gutter services market, which analysts valued at around USD 5.2 billion in 2023. With more extreme weather and homeowners investing in property preservation, that number is expected to hit nearly USD 9.1 billion by 2033.
How to Properly Patch Holes and Cracks
For damage that’s more serious than a simple failed seam—think holes from a fallen branch or a nasty crack from rust—sealant alone isn't going to do the job. You need to give it some structural backup with a patch. You can buy pre-made gutter patching kits, but a small scrap of metal flashing works just as well.
The prep is exactly the same: clean the area around the hole like your life depends on it. Scrape away all the rust and gunk with a wire brush. You want the clean area to be much larger than the hole itself so the patch has plenty of surface area to bond to.
Here’s a simple, rock-solid method for patching:
- Cut Your Patch: Snip a piece of metal flashing so it overlaps the hole by at least an inch on all sides.
- Apply Sealant: Put a thick layer of gutter sealant on the gutter surface around the hole.
- Press the Patch: Firmly press your metal patch down into that bed of sealant.
- Seal the Edges: Run another generous bead of sealant around all four edges of the patch, smoothing it down to create a totally sealed barrier.
Think of it as a "sealant sandwich." It creates an incredibly strong, waterproof fix that will often last as long as the rest of the gutter.
Re-Securing Loose and Sagging Gutters
Sometimes the leak isn't from a hole at all. It's from a gutter that has sagged and pulled away from the fascia board. When a gutter sags, water pools in that low spot instead of flowing to the downspout. That standing water is heavy, and it will eventually find a way out, either spilling over the side or leaking right through the screw holes.
Checking your gutter hangers is easy. Just gently push up on the sagging section. If it moves a lot or feels wobbly, the hangers are your problem. Most modern gutters are held up by long screws (sometimes called spikes or ferrules) that go through the gutter and into the fascia.
Over time, they can wiggle loose. The fix can be as simple as using a drill to drive the screw back in tight. If the hole is stripped out and the screw just spins, you'll need to replace it with a new, slightly larger gutter screw. Try to drive it into a fresh spot on the fascia a few inches away from the old hole. For an even better, stronger connection, I recommend upgrading to internal hidden hangers. They clip inside the gutter and screw directly to the fascia, providing much better support.
When you're dealing with larger cracks, getting the sealant application right is everything. For some more advanced tips, check out this excellent pro guide to caulking large gaps.
Whether you're fixing a small drip or thinking about a whole new system, understanding your options is the most important step. Properly installed and maintained gutters are one of the best investments you can make to protect your home's foundation and siding.
How Proactive Gutter Maintenance Prevents Future Leaks
You’ve just finished repairing your gutter leak. The last thing you want is to be back on that ladder a few months from now, staring at the same drip. So, how do you break the cycle?
The secret is shifting your mindset from reactive to proactive. A little routine maintenance goes a surprisingly long way, turning your gutters from a potential headache into a system that reliably protects your home.
Think of it this way: spending an hour or two on a sunny Saturday is a whole lot better than scrambling to fix a leak during a classic Upstate downpour. Consistent upkeep extends the life of your entire gutter system and, more importantly, protects your foundation, siding, and landscaping from costly water damage.
Establishing a Simple Seasonal Gutter Cleaning Routine
The number one most important maintenance task is also the simplest: keep your gutters clean. Clogged gutters are the root cause of the vast majority of problems, from sagging and overflowing to leaks at the seams.
For most homes around here, a twice-a-year cleaning schedule is the sweet spot. You just want to clear them out after the big debris-dropping seasons.
- Late Spring Cleaning: This is for all the blossoms, seed pods, and "helicopters" that clog things up. Getting that gunk out prevents it from creating dams that cause overflows during our heavy summer thunderstorms.
- Late Fall Cleaning: This is the big one. Once most of the leaves are down, a thorough clean-out gets your system ready for winter. This is critical for preventing ice dams, which have enough force to tear gutters right off your house.
While cleaning gutters isn't complicated, doing it safely is key. For a detailed walkthrough, our guide on how to clean gutters safely covers the essential tips for getting the job done right.
Upgrading Your System with Gutter Guards
If you're looking to seriously slash your time on a ladder, gutter guards can be a total game-changer. These systems are designed to cover your gutters, letting water in while keeping leaves, pine needles, and other junk out.
But they aren't a "set it and forget it" solution, and it’s important to know what you’re buying. There are three main types you'll run into:
Mesh Screens: These metal screens sit right on top of your existing gutters. They do a great job of blocking big leaves, but smaller stuff like pine needles and shingle grit can sometimes sneak through.
Foam Inserts: These are basically triangular foam plugs that you tuck inside the gutter trough. They block debris well but can get clogged with fine silt over time, meaning you might have to pull them out and rinse them every so often.
Solid Covers (Reverse Curve): These designs are pretty clever—they use water’s surface tension to let rain cling to the curved cover and flow into the gutter while leaves and debris just wash right over the edge. They work incredibly well but are usually the most expensive option.
Gutter protection isn't just a niche product anymore; it's a mainstream home improvement. The global market for gutter guards is expected to grow from USD 910 million in 2024 to about USD 1.42 billion by 2030. That’s a huge jump, and it shows just how much homeowners want to cut down on long-term maintenance.
The best choice for you really depends on the kinds of trees you have and your budget. For instance, if you're surrounded by pine trees, a screen with a very fine micro-mesh will serve you better than a standard one.
To dig deeper into keeping your gutters in peak condition, exploring this comprehensive gutter cleaning information is a fantastic next step.
Common Gutter Repair Questions Answered
After you’ve gone through the process of finding and diagnosing a leak, a few practical questions almost always pop up. Getting these details right is often the difference between a quick fix that lasts and having to climb that ladder all over again next season.
Let’s get into some of the most common questions homeowners ask when they’re standing in the hardware store aisle, trying to figure out how to fix their leaking gutters for good.
What Is the Best Sealant for Gutters?
This is probably the most important question of all, because choosing the wrong sealant guarantees a do-over. That standard silicone or all-purpose caulk you have in the garage just won't cut it. Those products aren't made to handle the constant water exposure and wild temperature swings your gutters go through.
For a repair that’s going to hold up, you absolutely need a sealant made specifically for gutters and outdoor use. Your best bet is a butyl rubber-based sealant. Here’s why it's the pro's choice:
- Superior Flexibility: Butyl sealants stay flexible long after they cure. This is huge, because it lets them expand and contract right along with your metal gutters as the temperature changes, which prevents the seal from cracking.
- Excellent Adhesion: This stuff creates a ridiculously strong, waterproof bond to all the common gutter materials—aluminum, vinyl, and even galvanized steel.
- Weather Resistance: Butyl sealants are built to withstand UV rays, rain, and ice, so they won't break down or get brittle after just one season in the Upstate sun.
When you're at the store, look for a product that's explicitly labeled "Gutter Sealant" or "Butyl Sealant." It might cost a few bucks more than generic caulk, but the performance is in a completely different league.
Can I Just Use Flex Seal on My Gutters?
It’s hard to miss the commercials marketing liquid rubber products like Flex Seal as a miracle cure-all. The temptation to just spray the problem away is real. But can it really fix your gutters? The honest answer is: it depends.
Flex Seal can work as a temporary patch for a very small, non-critical leak if you're in a pinch. If you just need to stop a drip before a storm rolls in, it's better than nothing. However, it should never be considered a permanent solution for leaky gutter seams or holes.
Proper gutter sealants are much thicker and are meant to be pushed deep into joints and cracks, creating a solid mechanical bond that a thin liquid rubber spray just can't match. Over time, that thin layer from a spray can will almost certainly peel or degrade, especially in a high-flow area like a gutter trough. For a reliable repair you can count on, stick with a real gutter sealant applied with a caulking gun.
Key Insight: Think of spray-on rubber as a bandage—it’s great for a quick fix, but it's no substitute for stitches. A butyl sealant provides the permanent, structural bond your gutters need to last.
How Much Does Fixing a Leaking Gutter Cost?
The cost to fix a leaking gutter can swing pretty wildly, and it really comes down to whether you do it yourself or bring in a professional.
A DIY repair is incredibly budget-friendly. Your main costs are the materials themselves, which are pretty cheap:
- A tube of high-quality gutter sealant: $10 - $15
- A gutter patching kit or a small piece of flashing: $5 - $10
- A wire brush and other cleaning supplies: $5 - $10
All in, you can often fix several small leaks for under $30, assuming you already have a ladder and some basic hand tools.
Hiring a professional gutter repair service will obviously cost more, but you're paying for their experience, safety gear, and the convenience of having it done right. Most companies have a minimum service charge, which usually starts around $150 to $250. That fee typically covers the first hour of labor, which is often enough time to clean and reseal a few leaky joints. For more involved repairs, like replacing a damaged section of gutter, the cost could easily climb to $300 or more.
If you find yourself constantly patching the same spots, it might be a sign that your gutters are simply wearing out. It's worth exploring the cost of seamless gutters to see if a long-term upgrade makes more sense—a new seamless system will eliminate most of the common leak points from the start.
For any exterior home project, from a simple gutter repair to a full siding replacement, having a trusted partner makes all the difference. At Atomic Exteriors, we combine professional craftsmanship with clear communication to protect and beautify your home. If you're ready for a permanent solution, contact us today for a free, no-obligation estimate.